How to Create a Bill Payment Form via K-Cyber

How to Create a Bill Payment Form via K-Cyber
How to Create a Form in Order to Make a Bill Payment Via K-Cyber

How to Create a Bill Payment Form via K-Cyber Specifically for a Business Customer

We have launched the feature, Bill Payment for company users that will help making payment transaction more convenient and can be done at any place and at any time. (Click here for more info)

Many of you may not know, yet, that the bill payment can create a form that can remember your data, which helps making your next transaction more convenient. The instruction of how to make the payment via K-Cyber is as follows.

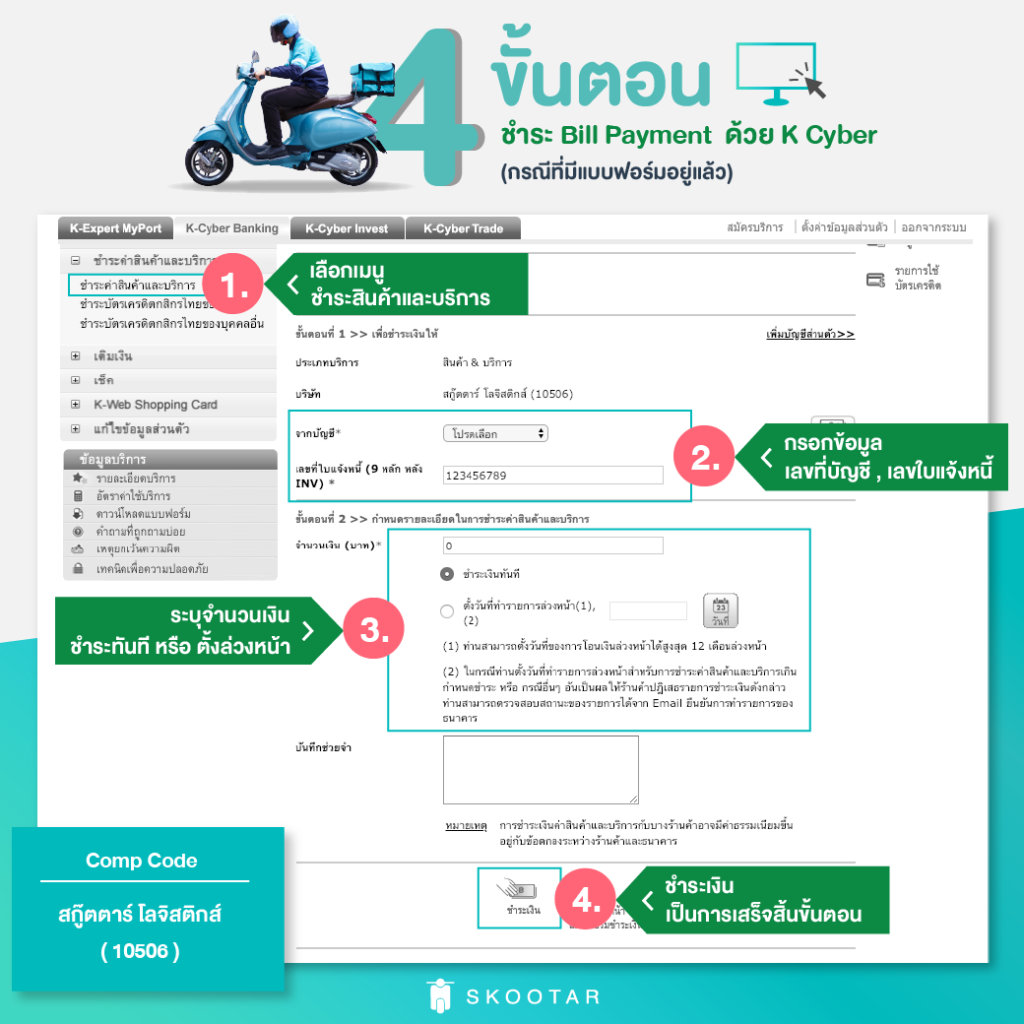
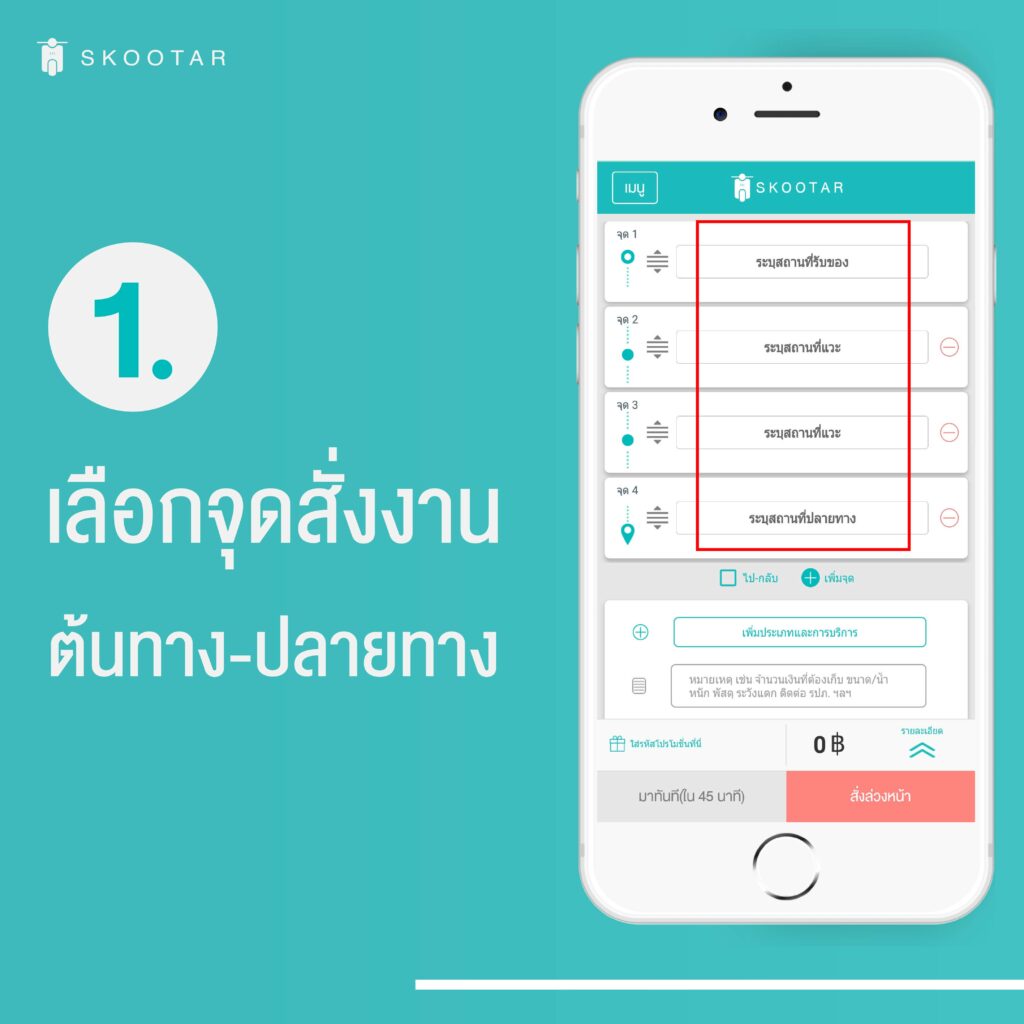
1. Sign in to the system of K-Cyber Banking. Select the left menu ‘Product & Service Payment’.

How to Create a Bill Payment Form via K-Cyber
Sign in to the system of K-Cyber Banking

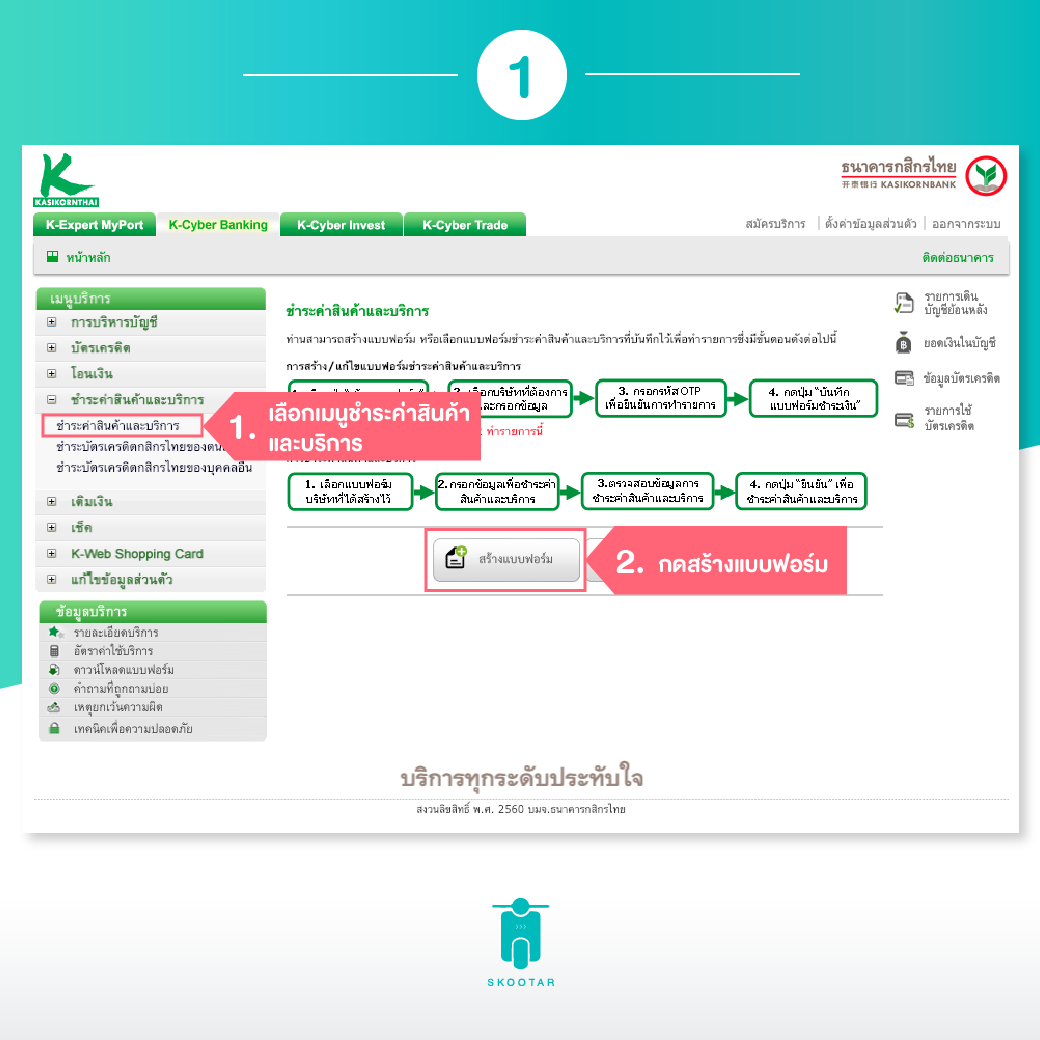
1. Select Menu ‘Product & Service Payment’

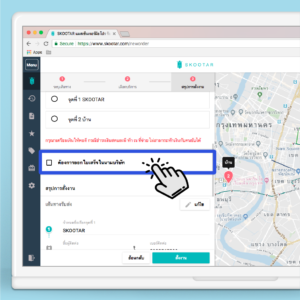
2. Click new billing template

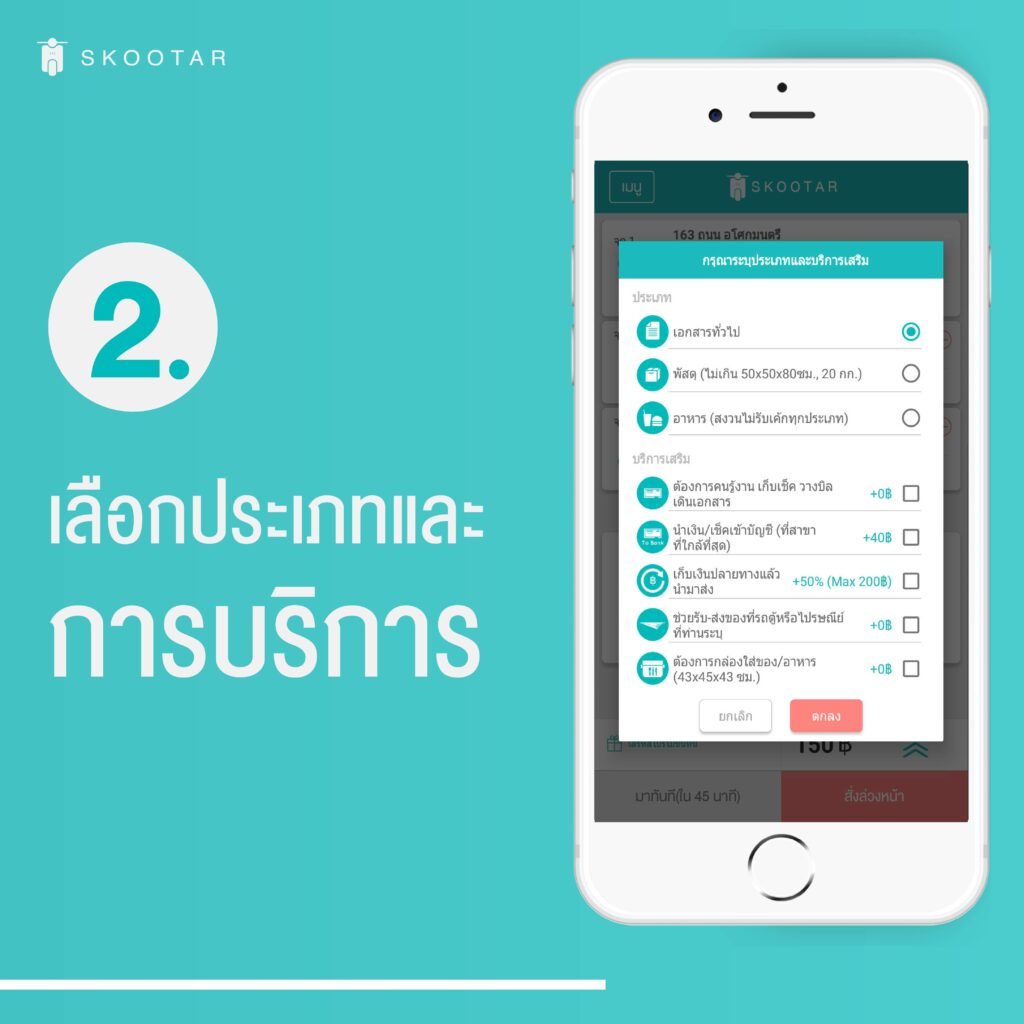
2. Product and service payment page. Select ‘New Billing Template’ button in order to access the page of product and service payment.

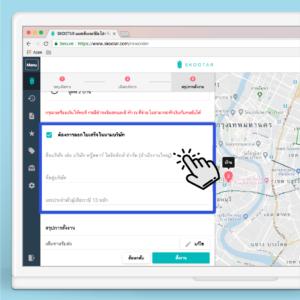
3. Bill payment form page. Create a form’s name > Select types of service for making payment ‘Products and Services’ > Select a Company you wish to make payment to. Click ‘Skootar Logistics (10506) > Select a bank account you wish to make payment > Fill out ‘Invoice Number’.

How to Create a Bill Payment Form via K-Cyber
Bill payment creating form screen

3. Fill out all of your detail

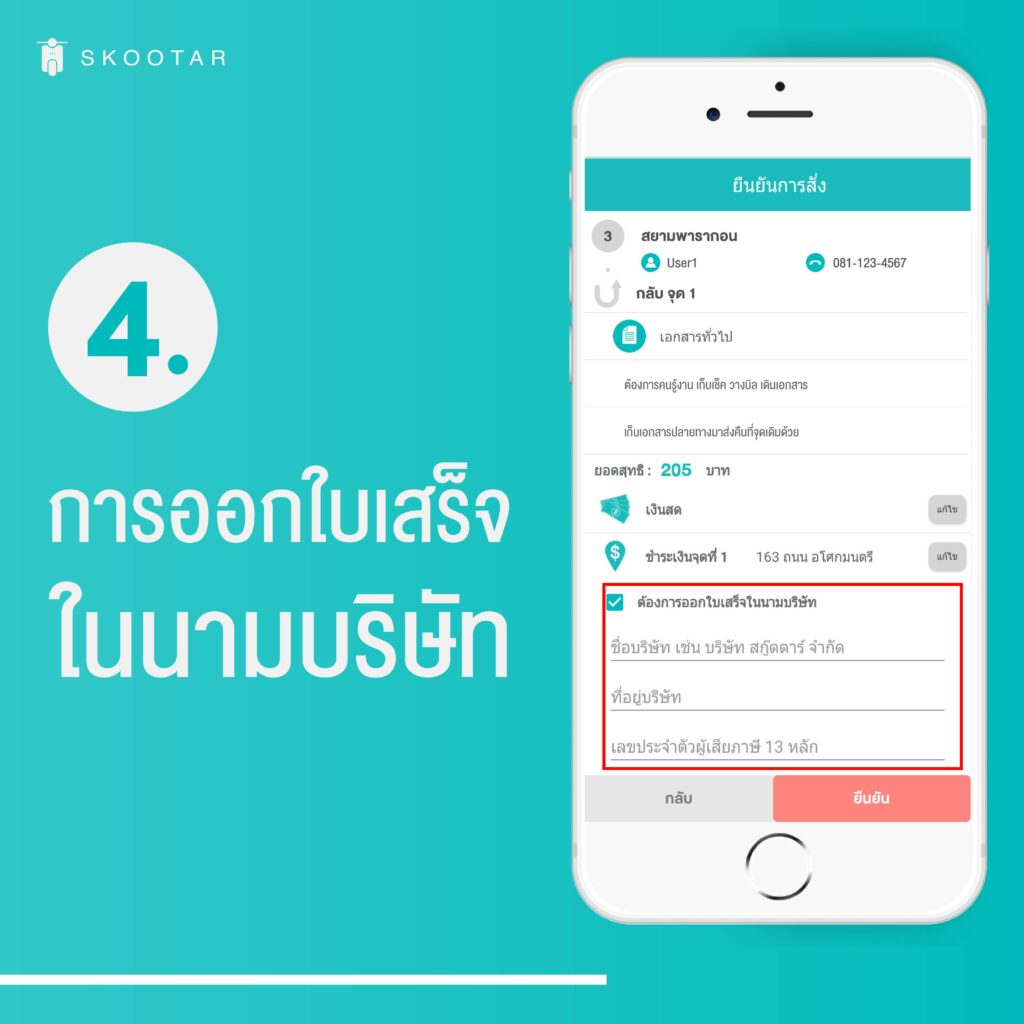
4. Once you fill out all of the correct detail, and then click save.

4. Bill payment creating form page. Click ‘Save Bill Payment Form’ button.

5. Bill payment form page – transaction checking. Enter OTP code from SMS, and then click ‘Confirm’ button.

How to Create a Bill Payment Form via K-Cyber
Bill payment form page – transaction-checking screen

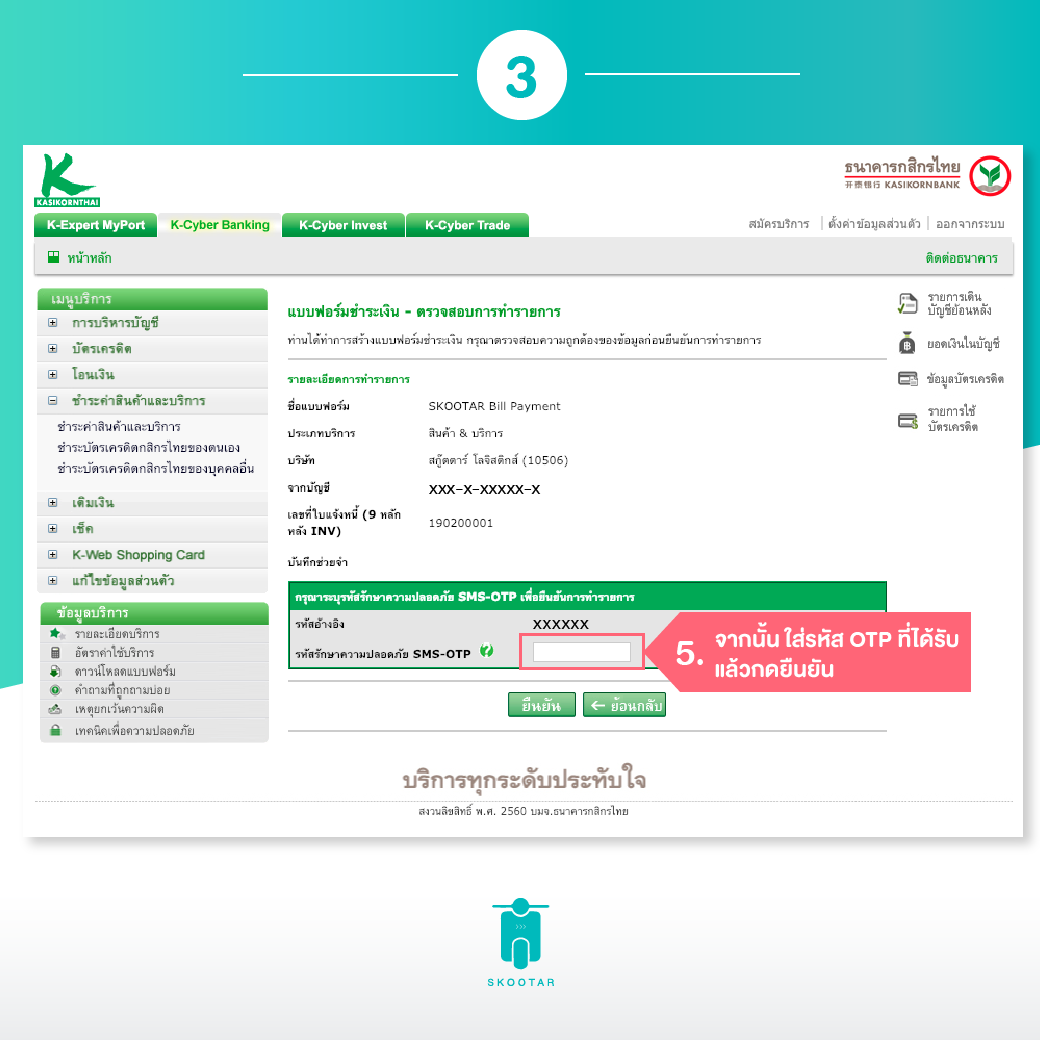
5. After that, enter OTP code from SMS, and then click ‘Confirm’ button.

6. Complete bill payment form. Click ‘Go Back to Bill Payment Form’ button.

How to Create a Bill Payment Form via K-Cyber
Complete bill payment form

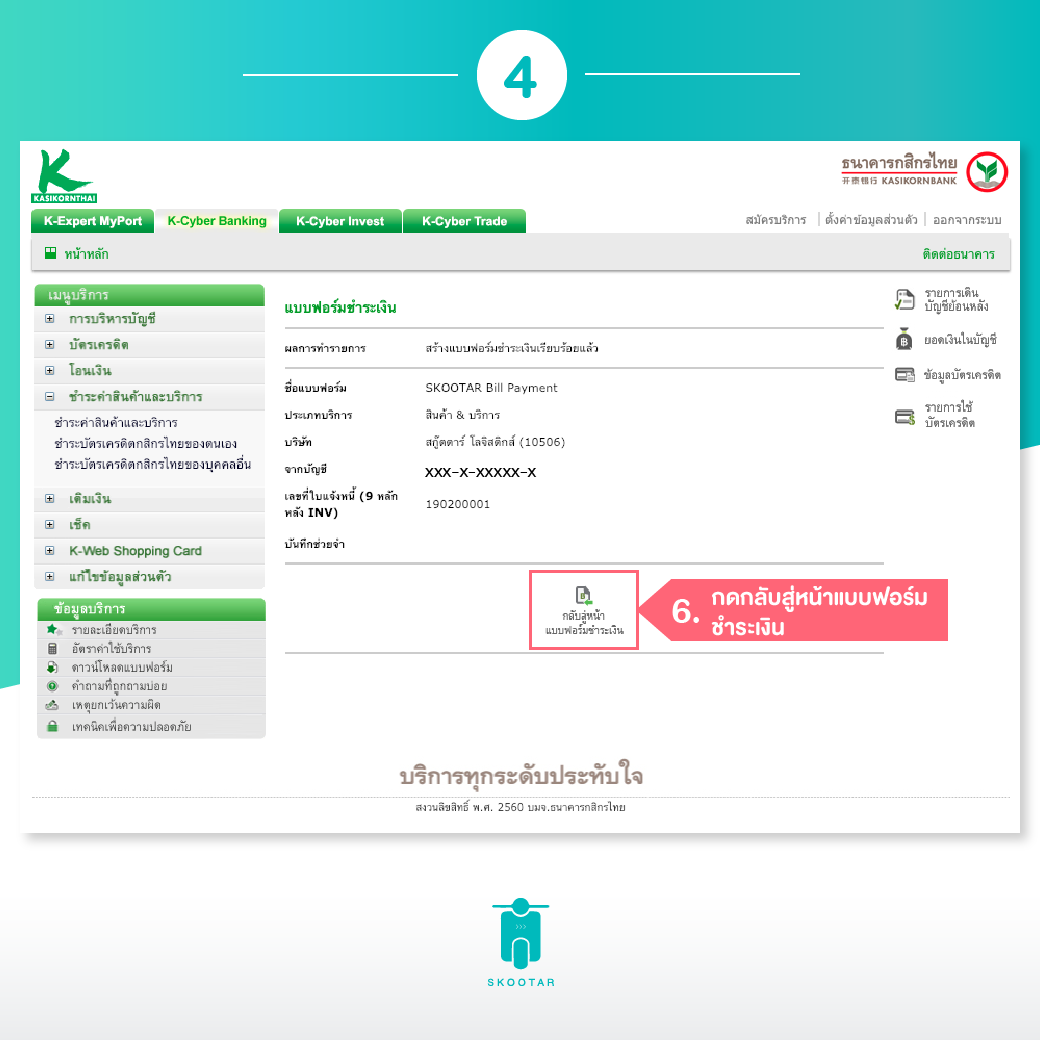
6. Click ‘Go Back to Bill Payment Form’ button.

7. Product and service payment page. Click a form to make a bill payment.

How to Create a Bill Payment Form via K-Cyber
Product and service payment screen

7. You will receive a list of bill payment form that was previously created.

Here It Is… A New Feature to Increase Convenience to Your Work

SKOOTAR Would Like to Present a New Feature That Will Boost Convenience to All of Business and Employee Customers’ Work

 That is the feature that includes group invoice and work monitoring as follows.

  1. Group Invoice

Have you ever experience receiving several invoices when your company set ups so many accounts? This problem will completely go away with this group invoice feature. The company now can make their order from any accounts they have, but they will receive only one invoice.

For example, Mr. A, Mr. B & Mr. C work for a company called HAPPYCOMPANY and they all separately book an order via SKOOTAR app. As a result, there are 3 invoice bills turned up at the company in the end of the month. With the function of this group invoice feature, the HAPPYCOMPANY will therefore only receive 1 invoice bill from Mr. A, Mr. B & Mr. C altogether.

  1. Work Monitoring

We categorize user rights into 2 levels, which are Super User Level and User Level. The super user level can look into all the number of orders from the level user.

For example, Mr. A, Mr. B & Mr. C work for a company called HAPPYCOMPANY and Mr. A is a boss of Mr. B & Mr. C. Now Mr. A wants to check orders of Mr. B & Mr. C., therefore this function comes to play as it can specify user rights which enable Mr. A to easily monitor and see the number of orders that Mr. B & Mr. C have made.

If you are interested in trying this feature, you can make a request by sending the following documents.

  1. Phor Phor 20 and Company certificate.
  2. E-mail addresses of users you wish to have in the group invoice.

For example:

staff01@company.com

staff02@company.com

staff01@company.com

  1. Detail to issue an invoice consists of the following information.

– Name and address of the Company

– First name and last name of invoice contact

– E-mail address to issue the invoice

  1. If you would like to use the work-monitoring feature, please kindly inform the following information.

– E-mail address you wish to rank as Super User Level

– E-mail address you wish to rank as User Level


Terms and Conditions of the Group Invoice Feature

  1. The invoice that you receive will not specify detail of order that a user has made.
  2. The invoice will be included in the billing cycle after the process of grouping invoice is finished.
  3. E-mail addresses of users you wish to include in the group invoice feature must be already registered with SKOOTAR.
  4. SKOOTAR will take about 5-7 days to install the group invoice feature for you.


For more information, please contact our sales team 02-105-4429.

Do You Know? An Individual Customer Can Now Issue a Receipt Under Company Name

Easily Issue Your Receipt Under Company Name

**For only customers who opt payment method by cash, credit card or PromptPay.

Have you ever booked an order with SKOOTAR and every time you receive an invoice only under your name? Besides that, it can also be such chaos to issue a receipt under company name, despite you make an order via SKOOTAR with a company. Also, sometimes the company may change its address and you cannot edit the old address to the new one right away on your receipt.

It may seem like a small problem, but many companies may not allow you to withdraw money by not having the company’s name on the receipt. Besides that, when the company changed its address, the receipt may still be issued under the old address. That can usually be very time consuming to process.

Today… all of these problems will be gone, once you get to experience with our new feature, ‘Issuing a Receipt Under a Company Name’ via our website or SKOOTAR app.

2 Steps on How to Use the Feature on the SKOOTAR Website

1. After you select your preferred type of payment, click ‘Issue a Receipt Under Company Name’ button.
2. Fill out your name, address and taxpayer identification number.

4 Steps on How to Use the Feature on the SKOOTAR App

1. Open SKOOTAR app, then choose your preferred location from starting point to ending point (up to 10 locations). You can have a messenger to go back to the starting point by selecting ‘Round Trip’.
company-receipt-by-app-step1

2. Select your preferred category and service. You can add more detail in a note box regarding things you would like your messenger to know.

company-receipt-by-app-step2

3. Enter a promo code (if any) and click ‘Now’ (in 45 minutes) in order to call a messenger to pick up your package right away or click ‘Later’ in order to book an order in advance.
company-receipt-by-app-step3

4. On the screen of confirming an order, make sure all of the information is correct. After that, click ‘Issue a Receipt Under Company Name’, and then fill out all of the detail to confirm.

company-receipt-by-app-step4

Just simple as this, now you can have a receipt issued under your company’s name. Now you do not have to deal all kinds of problems any more.

Term and Condition of Issue a Receipt Under a Company Name Feature

  • The feature can be used with payment method such as cash, credit card or PromptPay. The feature is not compatible with payment method such as invoice payment and SKOOTAR wallet.

If you had any questions, feel free to contact us at our call center 02 105 4429 during working hours.

API Connection System Service for an Organization

Connect Your System with SKOOTAR. Customer Back-Office System > SKOOTAR Driver

Free API Connection System for an Organization

How good is API connection system? API stands for Application Programing Interface. It is a channel for connecting between back-office system of your website or an app with SKOOTAR system. It can enhance the capability of the system to meet the need of users better. It is quite suitable for E-commerce business that has its own system.

For example – a food delivery website or app; when a customer orders food from your application and wishes to have a messenger picked up the food from a restaurant, and then to deliver it to A location. The customer can simply connect with SKOOTAR API in order to immediately make the order without visiting SKOOTAR website or app. Therefore, it helps saving time from making an order, also enhancing your business management more efficient.

Frequent Questions

What can SKOOTAR API do?

Main API consists as follows.
1. Estimate Price – can check prices before making an order.
2. Create New Job – make an order.
Once you complete making an order, there will be job detail to response you back.
Once you create a new job, there will be a box to enter a call back URL. And once status of your order is changed, there will be a call back to notify you.
3. Job Detail – can follow status of order and check order detail.
4. Cancel Job – can cancel your order when there is no messenger accepts the order, yet.

Is it hard to connect SKOOTAR API? Which language does it use? And how long does it take?
SKOOTAR API connection uses JSON language (Request JSON and Response JSON). Generally, it takes about 2-4 weeks to set up API connection.

Does SKOOTAR API cost?
SKOOTAR API connection does not cost anything. SKOOTAR team will send API document, as well as develop key and production key to your team development so that you can connect with your back-office system. Our team will assist you via SKOOTAR Line IT in case of any unexpected problems with system connection.

Is there a minimum usage of SKOOTAR API connection?
The minimum usage is 100 orders or jobs per month.

Who can I contact, if there was any problems occur?
You can contact SKOOTAR Line IT for any technical problems or contact our call center for any general problems at 02-105-4429.

Where can I check order detail?
You can check your order detail and status of your active order or complete order via www.skootar.com by going to ‘Menu’ > ‘Current Order’ or ‘Complete Order’.

Can I add other features if I want to?
Yes, SKOOTAR API can modify features that can be suitable for your usage. For more information regarding feature changing, please kindly contact api@skootar.com.

How to Set Up an API Account

1. Register to be a SKOOTAR Company/Organization Customer
You can register here https://www.skootar.com

2. Submit the following information at teepob@skootar.com ,api@skootar.com
– Registered SKOOTAR e-mail address for a Company/Organization customer type
– Company certificate
– Phor Phor. 20 (if any)

3. Wait for confirmation e-mail from SKOOTAR team in order to send you API Document, as well as, develop key and production key,

Sign Up SKOOTAR 

วิธีสร้างแบบฟอร์มชำระ Bill Payment ผ่าน K-cyber

วิธีสร้างแบบฟอร์มชำระ Bill Payment ผ่าน K-cyber

วิธีสร้างแบบฟอร์มชำระ Bill Payment ผ่าน K-cyber สำหรับลูกค้ากลุ่มบริษัทโดยเฉพาะ

หลังจากเปิดตัวฟีเจอร์ชำระ Bill Payment สำหรับผู้ใช้งานกลุ่มบริษัท ที่จะช่วยให้การชำระบิลง่ายขึ้น ทำได้ทุกที่ ทุกเวลา ตามความสะดวกของลูกค้า (ดูเพิ่มเติมได้ ที่นี่)

หลายท่านอาจยังไม่ทราบว่าการชำระ Bill Payment นั้น สามารถสร้างฟอร์มเพื่อจดจำการชำระบิลทำในครั้งถัดไปง่ายขึ้น โดยทำตามขั้นตอนผ่าน K-cyber ดังนี้

1. ล็อกอินเข้าสู่ระบบ K-Cyber Banking เลือกเมนูหลักด้านซ้ายมือ “ชำระค่าสินค้าและบริการ”

วิธีสร้างแบบฟอร์มชำระ Bill Payment ผ่าน K-cyber
ล็อกอินเข้าสู่ระบบ K-Cyber Banking

2. หน้าจอชำระค่าสินค้าและบริการ เลือกปุ่ม “สร้างแบบฟอร์มการชำระเงิน / New Billing Template” เพื่อเข้าหน้าจอชำระค่าสินค้าและบริการ

3. หน้าจอสร้างแบบฟอร์มชำระเงิน ตั้งชื่อแบบฟอร์ม > เลือกประเภทบริการที่ต้องการชำระ คลิกเลือก “สินค้าและบริการ” > เลือกบริษัทที่ต้องการชำระ คลิกเลือก “สกู๊ตตาร์ โลจิสติกส์ (10506)” > เลือกบัญชีที่ต้องการชำระเงิน > ใส่ “เลขที่ใบแจ้งหนี้”

วิธีสร้างแบบฟอร์มชำระ Bill Payment ผ่าน K-cyber
หน้าจอสร้างแบบฟอร์มชำระเงิน

4. หน้าจอสร้างแบบฟอร์มชำระเงิน คลิกปุ่ม “บันทึกแบบฟอร์มชำระเงิน”

5. หน้าจอแบบฟอร์มชำระเงิน – ตรวจสอบการทำรายการ ใส่รหัส OTP ที่ได้รับผ่านทาง SMS คลิกปุ่ม “ยืนยัน”

วิธีสร้างแบบฟอร์มชำระ Bill Payment ผ่าน K-cyber
หน้าจอแบบฟอร์มชำระเงิน – ตรวจสอบการทำรายการ

6. หน้าจอแบบฟอร์มชำระเงิน คลิกปุ่ม “กลับสู่หน้าแบบฟอร์มชำระเงิน”

วิธีสร้างแบบฟอร์มชำระ Bill Payment ผ่าน K-cyber
หน้าจอแบบฟอร์มชำระเงิน

7. หน้าจอชำระสินค้าและบริการ คลิกเลือกแบบฟอร์มเพื่อชำระ Bill Payment ได้เลย

วิธีสร้างแบบฟอร์มชำระ Bill Payment ผ่าน K-cyber
หน้าจอชำระสินค้าและบริการ

มาดูขั้นตอนชำระ Bill Payment กันเถอะ

มาดูขั้นตอนชำระ Bill Payment กันเถอะ

ฟีเจอร์ใหม่ล่าสุดจาก SKOOTAR  สำหรับผู้ใช้งานกลุ่มบริษัทโดยเฉพาะ ที่จะช่วยให้ลูกค้าสะดวกในการชำระเงินมากขึ้นและไม่ต้องส่งหลักฐานการชำระเงินอีกต่อไป โดยจะเริ่มใช้งานรอบบิลแรกในเดือนกุมภาพันธ์ ปี 2562 เป็นต้นไป ซึ่งลูกค้าจะได้รับเอกสาร “ใบแจ้งการชำระเงิน” เพิ่มขึ้นอีก 1 แผ่น พร้อมบาร์โคด ที่พร้อมให้ลูกค้าสามารถชำระ Bill Payment ได้ง่ายๆ ผ่านช่องทางดังนี้

1. ธนาคารกสิกรไทยทุกสาขา โดยลูกค้าสามารถทำธุรกรรมได้ทั้งที่สาขา หรือผ่านช่องทางอิเล็คทรอนิคต่างๆ โดยไม่เสียค่าธรรมเนียมแต่อย่างใด ทำตามขั้นตอนง่ายๆ ด้านล่างได้เลย

  • K-Plus
    ขั้นตอนชำระ Bill Payment ผ่าน K Plus
    ขั้นตอนชำระ Bill Payment ผ่าน K Plus
  • K-Cyber ซึ่งสามารถสร้างแบบฟอร์มชำระเงินได้ด้วยนะ รายละเอียด
    ขั้นตอนชำระ Bill Payment ผ่าน K Cyber
    ขั้นตอนชำระ Bill Payment ผ่าน K Cyber
  • ATM
    ตัวอย่าง Bill Payment
    ตัวอย่าง Bill Payment

1. เสียบบัตร ATM
2. ใส่รหัสบัตร ATM ของท่าน
3. กด ‘จ่ายบิล/ชำระเงิน Payment/Barcode Payment’
4. กด ‘อื่นๆ/ระบุรหัสบริษัท Other/ Specify Company ID’
5. กด ‘บัญชีออมทรัพย์’
6. ใส่รหัส Company ID ‘10506’ (สกู๊ตตาร์ โลจิสติกส์)
7. ใส่เลขที่ใบแจ้งหนี้ (Ref.1)  ตามใบแจ้งชำระเงิน
8. ใส่รหัสลูกค้า (Ref.2) ตามใบแจ้งชำระเงิน
9. ใส่จำนวนเงินที่ต้องโอนเงิน
10. ตรวจสอบความถูกต้องก่อนกด ‘ยืนยัน

  • สาขาใกล้คุณ

2. ช่องทางของธนาคารอื่นๆ คลิกที่นี่ เพื่ออ่านข้อมูลเพิ่มเติม

หากลูกค้าต้องการสอบถามข้อมูลเพิ่มเติมสามารถติดต่อ Call Center โทร 02 105 4429 ในวันและเวลาทำการค่ะ

ฟีเจอร์ใหม่ ใบแจ้งชำระเงิน สำหรับชำระเงินผ่านธนาคาร

SKOOTAR Bill Payment

ฟีเจอร์ใหม่ ใบแจ้งการชำระเงิน สำหรับชำระเงินผ่านธนาคาร (Bill Payment)

ข่าวดี เพื่ออำนวยความสะดวกให้ลูกค้ามากขึ้น ลูกค้าในกลุ่มบริษัทที่เลือกวิธีการชำระเงินผ่านใบแจ้งหนี้ จะได้รับเอกสารเพิ่มเติมนอกเหนือจากใบแจ้งหนี้อีก 1 แผ่นคือ “ใบแจ้งการชำระเงิน” ตั้งแต่รอบบิลเดือนกุมภาพันธ์ ปี 2562 เป็นต้นไป ข้อดีของการชำระเงินรูปแบบใหม่คือ ลูกค้าไม่ต้องแจ้งการชำระเงินกับ SKOOTAR อีกต่อไป ในขณะที่การชำระเงินโดยวิธีโอนเงินแบบเดิมก็ยังสามารถทำได้ แต่ลูกค้าจะต้องแจ้งการชำระเงินกับ SKOOTAR ทุกครั้ง

Bill Payment example

ในเอกสารจะแจ้งยอดเงินที่ต้องชำระพร้อมบาร์โคด โดยท่านสามารถชำระเงินได้ง่ายๆผ่านช่องทางดังต่อไปนี้

1. ช่องทางอิเล็คทรอนิคต่างๆของธนาคารกสิกรไทย เช่น  ATM/ K-Plus/ K-Cyber/ K-Biznet/ K-Cash Connect โดยไม่เสียค่าธรรมเนียมแต่อย่างใด คลิกที่นี่

2. ธนาคารกสิกรไทยทุกสาขา โดยไม่มีค่าธรรมเนียม

3. ช่องทางของธนาคารอื่นๆ คลิกที่นี่ เพื่ออ่านข้อมูลเพิ่มเติม

หากลูกค้าต้องการสอบถามข้อมูลเพิ่มเติมสามารถติดต่อ Call Center โทร 02 105 4429 ในวันและเวลาทำการค่ะ

เรียก SKOOTAR เลย

ลูกค้าบุคคลที่ใช้แอป SKOOTAR สามารถออกใบเสร็จในนามบริษัทได้แล้วนะ

แอป SKOOTAR สามารถออกใบเสร็จในนามบริษัทได้

ลูกค้าบุคคลที่ใช้แอปฯ SKOOTAR สามารถออกใบเสร็จในนามบริษัทได้แล้ว

เมื่อเดือนกันยายน 61 ที่ผ่านมา SKOOTAR ได้นำเสนอฟีเจอร์ที่ลูกค้าบุคคลสามารถสั่งงาน SKOOTAR  แต่ใบเสร็จที่ได้รับจะออกในนามบริษัท จุดประสงค์เพื่อนำไปเบิกในกรณีที่ บริษัทที่เราทำงานอยู่ไม่ได้มีชื่อผู้ใช้ในนามบริษัท ซึ่งในขณะนั้นทำได้เมื่อสั่งงานผ่านช่องทางเว็บไซต์เพียงอย่างเดียวเท่านั้น สามารถอ่านวิธีออกใบเสร็จในนามบริษัทผ่านช่องทางเว็บไซต์ได้ ที่นี่

ลูกค้าที่ใช้แอปฯ SKOOTAR สามารถออกใบเสร็จในนามบริษัทได้ดังนี้

company-receipt-by-app-step1

  1. เปิดแอปพลิเคชั่น SKOOTAR เลือกจุดสั่งงานต้นทาง และเลือกจุดหมายปลายทาง (สูงสุด 10 จุด) สามารถเลือกให้แมสเซ็นเจอร์กลับมาที่จุดเริ่มต้นได้ โดยเลือก “ไป-กลับ”company-receipt-by-app-step2
  2. เลือกประเภทและการบริการ ใส่หมายเหตุเพื่อบอกรายละเอียดที่แมสเซ็นเจอร์ควรทราบในการทำงานcompany-receipt-by-app-step3
  3. ใส่รหัสโปรโมชั่น (ถ้ามี) กดมาทันที(ใน 45 นาที) เพื่อเรียกแมสเซ็นเจอร์มารับงานให้เร็วที่สุด หรือกดสั่งงานล่วงหน้า สำหรับลูกค้าที่ต้องการสั่งงานล่วงหน้าcompany-receipt-by-app-step4
  4. ในหน้ายืนยันการสั่งงาน ให้ลูกค้าตรวจสอบข้อมูลการสั่งงานอีกครั้ง ต่อมาเลือก “ต้องการออกใบเสร็จในนามบริษัท” กรอกข้อมูลให้เรียบร้อย และกดยืนยันเพื่อสั่งงาน

**สำหรับลูกค้าที่เลือกวิธีการชำระเงินแบบ เงินสด บัตรเครดิต หรือพร้อมเพย์ ตอนสั่งงานเท่านั้นนะคะ

รู้หรือไม่? ลูกค้าบุคคลสามารถออกใบเสร็จในนามบริษัทได้แล้วนะ

ออกใบเสร็จในนามบริษัทง่ายๆ

**สำหรับลูกค้าที่เลือกวิธีการชำระเงินแบบ เงินสด บัตรเครดิต หรือพร้อมเพย์ ตอนสั่งงานเท่านั้นนะคะ

เคยไหม ที่สั่งงานผ่าน SKOOTAR พอจบงานทีไรใบเสร็จที่ได้มาก็เป็นชื่อของผู้สั่งงานทุกที อยากจะขอใบเสร็จในนามบริษัทก็วุ่นวาย ทั้งๆที่สั่งงานผ่าน SKOOTAR ให้กับบริษัทแท้ๆ หรือบางทีบริษัทเปลี่ยนที่อยู่ แลัวอยากจะให้ใบเสร็จที่ได้จากการสั่งงานผ่าน SKOOTAR เป็นที่อยู่ใหม่ในทันทีก็ทำไม่ได้

แค่หัวใบเสร็จที่ไม่ได้ดั่งใจ เหมือนจะเป็นเรื่องเล็กน้อย แต่ก็ทำให้เกิดปัญหาหลายอย่างตามมา บางทีพอจะเอาใบเสร็จในนามบุคคลธรรมดา ไปเบิกเงินกับบริษัท ก็จะไม่สามารถเบิกได้ หรือบางทีถ้าบริษัทเปลี่ยนชื่อ หรือที่อยู่ใหม่ แต่พอสั่งงานผ่าน SKOOTAR กลับได้ใบเสร็จที่มีชื่อและที่อยู่เก่าของบริษัท ก็จะต้องมาทำการเปลี่ยนใบเสร็จใหม่ วุ่นวายไปหมด

วันนี้ … ปัญหาเหล่านี้จะหมดไป เมื่อคุณได้รู้จักกับ ฟีเจอร์ใหม่ผ่าน เว็บไซต์ และ แอปฯ SKOOTAR นั่นก็คือ ฟีเจอร์ “ออกใบเสร็จในนามบริษัท”

ขั้นตอนการใช้งานฟีเจอร์บนเว็บ SKOOTAR

  1. หลังจากเลือกจุดที่ต้องการชำระเงินแล้ว ให้เลือกที่ปุ่ม “ต้องการออกใบเสร็จในนามบริษัท”2. กรอกชื่อ ที่อยู่ รวมถึง เลขประจำตัวผู้เสียภาษีของบริษัท

ขั้นตอนการใช้งานฟีเจอร์บนแอปฯ SKOOTAR

  1. เปิดแอปพลิเคชั่น SKOOTAR เลือกจุดสั่งงานต้นทาง และเลือกจุดหมายปลายทาง (สูงสุด 10 จุด) สามารถเลือกให้แมสเซ็นเจอร์กลับมาที่จุดเริ่มต้นได้ โดยเลือก “ไป-กลับ”company-receipt-by-app-step1
  2. เลือกประเภทและการบริการ ใส่หมายเหตุเพื่อบอกรายละเอียดที่แมสเซ็นเจอร์ควรทราบในการทำงานcompany-receipt-by-app-step2
  3. ใส่รหัสโปรโมชั่น (ถ้ามี) กดมาทันที(ใน 45 นาที) เพื่อเรียกแมสเซ็นเจอร์มารับงานให้เร็วที่สุด หรือกดสั่งงานล่วงหน้า สำหรับลูกค้าที่ต้องการสั่งงานล่วงหน้าcompany-receipt-by-app-step3
  4. ในหน้ายืนยันการสั่งงาน ให้ลูกค้าตรวจสอบข้อมูลการสั่งงานอีกครั้ง ต่อมาเลือก “ต้องการออกใบเสร็จในนามบริษัท” กรอกข้อมูลให้เรียบร้อย และกดยืนยันเพื่อสั่งงาน

company-receipt-by-app-step4

เพียงเท่านี้ ใบเสร็จที่ได้จากการสั่งงานของคุณ ก็จะเป็นใบเสร็จในนามบริษัทที่คุณต้องการ และปัญหาต่างๆที่เคยกวนใจเกี่ยวกับใบเสร็จที่ไม่ได้ดั่งใจก็จะหมดไป

เงื่อนไขการใช้ฟีเจอร์ออกใบเสร็จในนามบริษัท

  • สามารถใช้ได้กับวิธีการจ่ายเงินแบบ เงินสด บัตรเครดิต หรือ พร้อมเพย์เท่านั้น ไม่สามารถใช้ได้กับวิธีการจ่ายเงินแบบใบแจ้งหนี้ และ SKOOTAR Wallet

หากลูกค้ามีข้อสงสัย หรือต้องการติดต่อสอบถามรายละเอียดต่างๆ ติดต่อ Call Center โทร 02 105 4429 ในวันและเวลาทำการค่ะ

มาแล้ว … ฟีเจอร์ใหม่ เพิ่มความสะดวกในการทำงานให้กับคุณ

SKOOTAR ขอแนะนำฟีเจอร์เพื่อเพิ่มความสะดวกในการทำงานให้ผู้ประกอบการ และพนักงานทุกคน

นั่นก็คือ ฟีเจอร์ รวมใบแจ้งหนี้ และ กำหนดสิทธิ์ของผู้ใช้งาน  โดยมีรายละเอียดดังนี้

  1. รวมใบแจ้งหนี้
    เคยเป็นไหม ที่ในบริษัทเปิดหลายบัญชีไว้ใช้สั่งงาน แต่ใบแจ้งหนี้ก็ส่งมาหลายใบเช่นกัน … ปัญหานี้จะหมดไปด้วยฟีเจอร์ รวมใบแจ้งหนี้ ซึ่งจะทำให้บริษัทสามารถสั่งงานโดยใช้กี่บัญชีก็ได้ แต่จะมีใบแจ้งหนี้ส่งมาให้แค่ใบเดียวเท่านั้น
    ตัวอย่างเช่น นายA นายB และนายC ทำงานอยู่บริษัท HAPPYCOMPANY และแยกกันสั่งงานผ่านแอปฯ SKOOTAR ทำให้ในสิ้นเดือน มีใบแจ้งหนี้เรียกเก็บเงินกับทางบริษัทมากถึง 3 ใบ แต่ด้วยฟังก์ชั่นรวมใบแจ้งหนี้ จะทำให้บริษัท HAPPYCOMPAY ได้รับใบแจ้งหนี้จากนายA นายB และนายC เพียงแค่ใบเดียวเท่านั้น
  2. กำหนดสิทธิ์ของผู้ใช้งาน
    โดยเราจะแบ่งสิทธิ์ของผู้ใช้งานออกเป็น 2 level ซึ่งก็คือ Level Super User และ Level User ซึ่ง Level Super User สามารถที่จะดูจำนวนงาน Level User สั่งไปทั้งหมดได้
    ตัวอย่างเช่น นายA นายB และนายC ทำงานอยู่บริษัท HAPPYCOMPANY นาย A เป็นหัวหน้าของ นายB และนายC และนายA ต้องการตรวจเช็คการสั่งงานของ นายB และนายC ด้วยฟังก์ชั่น กำหนดสิทธิ์ของผู้ใช้งาน จะทำให้นายA สามารถเห็นจำนวนงานที่นายB และนายC สั่งได้ง่ายๆ

อ่านมาถึงตรงนี้แล้ว ถ้าคุณลูกค้าสนใจอยากจะลองใช้งานฟีเจอร์ดังกล่าว สามารถทำเรื่องขอใช้งานได้โดยการ ส่งเอกสารมาให้ทางเรา ดังต่อไปนี้
1 เอกสารในการเปิดบัญชีบริษัท ได้แก่ ใบ ภ.พ. 20 และ หนังสือรับรองบริษัท
2. อีเมลของผู้ใช้ที่ต้องการให้รวมใบแจ้งหนี้ไว้ด้วยกัน
ตัวอย่างเช่น
staff01@company.com
staff02@company.com
staff03@company.com
3. รายละเอียดในการออกใบแจ้งหนี้ ประกอบด้วย
– ชื่อ-ที่อยู่ ของบริษัท
– ชื่อ-สกุล ผู้ติดต่อในใบแจ้งหนี้
– อีเมลที่ต้องการให้ส่งใบแจ้งหนี้ไปให้
4. หากต้องการใช้ฟังก์ชั่นกำหนดสิทธิ์ของผู้ใช้งาน ก็ให้แจ้งมาว่า
– ต้องการให้อีกเมลใดเป็น Level Super User
– ต้องการให้อีเมลใดเป็น Level User

เงื่อนไขในการใช้งานฟีเจอร์รวมใบแจ้งหนี้

1. ใบแจ้งหนี้ที่ลูกค้าได้รับจะไม่ระบุรายละเอียดของงานที่ผู้ใช้งานได้สั่งไป
2. ใบแจ้งหนี้จะถูกรวมในรอบบิลถัดไป หลังจากกระบวนการรวมใบแจ้งหนี้ได้สำเร็จเรียบร้อยแล้ว
3. อีเมลของผู้ใช้ที่ต้องการให้รวมใบแจ้งหนี้ไว้ด้วยกัน ทุกอีเมลจะต้องลงทะเบียนเป็นสมาชิกกับสกู๊ตตาร์เรียบร้อยแล้ว
4. ชื่อผู้ติดต่อที่ระบุบนใบแจ้งหนี้ ชื่อบุคคลนั้นต้องเป็นชื่อที่อยู่ในอีเมลของผู้ที่ต้องการให้รวมใบแจ้งหนี้ไว้ด้วยกัน
5. ทางบริษัทฯ ใช้ระยะเวลาประมาณ 5-7 วันทำการในการติดตั้งฟีเจอร์รวมใบแจ้งหนี้ให้กับคุณ

สอบถามข้อมูลเพิ่มเติม ติดต่อ ฝ่ายขาย เบอร์โทร 02-105-4429