การจัดส่งสินค้า และเอกสารที่รวดเร็วกลายเป็นปัจจัยสำคัญของความสำเร็จ โดยเฉพาะในพื้นที่เศรษฐกิจสำคัญอย่างจังหวัดชลบุรี ที่เป็นศูนย์กลางอุตสาหกรรม การค้า และการท่องเที่ยวของภาคตะวันออก SKOOTAR บริการส่งของด่วนชลบุรี จึงเป็นอีกทางเลือกที่ตอบโจทย์สำหรับธุรกิจที่ต้องการความรวดเร็วและความน่าเชื่อถือในการจัดส่ง

สกู๊ตตาร์ ขนส่งด่วนออนไลน์มือโปร คือใคร
SKOOTAR บริการรับ-ส่งของด่วน ส่งเอกสารแบบมือโปรผ่านแพลตฟอร์มออนไลน์สำหรับธุรกิจ เริ่มต้นให้บริการในกรุงเทพฯ ปริมณฑล และขยายมาสู่พื้นที่เศรษฐกิจสำคัญอย่างชลบุรี เพื่อตอบสนองความต้องการด้านขนส่งด่วนของธุรกิจในพื้นที่ที่ต้องการบริการขนส่งที่รวดเร็ว เชื่อถือได้
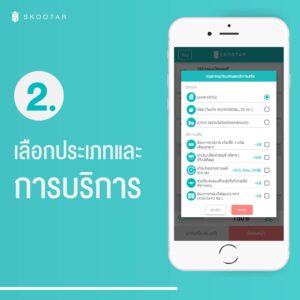
ประเภทของบริการส่งพัสดุด่วนชลบุรี ด้วย SKOOTAR
- บริการส่งด่วนใน 2 ชม.* (On-demand Delivery)
- เหมาส่งสุดคุ้ม (4 ชม. และ 9 ชม.)
- บริการรับ-ส่งของชลบุรีแบบหลายจุด ด้วยฟีเจอร์จัดเรียงเส้นทางที่รวดเร็ว และคุ้มค่า
- บริการส่งสินค้าขนาดใหญ่ด้วยรถกระบะ
- บริการขนส่งสินค้าเปราะบางด้วยรถยนต์
บริการรับ-ส่งของชลบุรี SKOOTAR ตอบโจทย์ธุรกิจอย่างไรบ้าง
- จัดการเอกสารได้ง่ายขึ้น
ตอบโจทย์การใช้งานด้วย Multi-user account ที่สามารถกำหนดสิทธิ์การเข้าถึงข้อมูลของพนักงานในบริษัทได้ ทำให้แต่ละแผนกสามารถสั่งงานขนส่งได้อย่างอิสระ โดยสามารถรวมใบแจ้งหนี้ได้ใน 1 ใบเพื่อง่ายต่อการจัดการทางบัญชี รวมถึงสามารถชำระเงินแบบวางบิลได้* โดยไม่มีขั้นต่ำ - ช่วยออกแบบโซลูชันการจัดส่งที่เหมาะสมให้คุณ
สกู๊ตตาร์พร้อมให้คำปรึกษา และออกแบบโซลูชันการจัดส่งที่เหมาะสมกับความต้องการเฉพาะของธุรกิจคุณ โดยทีมงานจะวิเคราะห์รูปแบบการจัดส่งของคุณเพื่อเสนอแนะวิธีการที่จะช่วยควบคุมต้นทุน และเพิ่มประสิทธิภาพในการจัดส่ง - ทีมแอดมินดูแลสำหรับบริษัทคุณโดยเฉพาะ
ลูกค้าองค์กรของสกู๊ตตาร์จะได้รับการดูแลจากทีมแอดมินเฉพาะที่คอยให้ความช่วยเหลือและแก้ไขปัญหาที่เกี่ยวข้องกับการจัดส่ง ทีมงานเหล่านี้มีความเข้าใจในธุรกิจของคุณและความต้องการเฉพาะต่างๆ จึงสามารถให้บริการที่รวดเร็ว และตรงประเด็นไม่ว่าจะเป็นการตอบคำถาม แก้ไขปัญหาเร่งด่วน หรือการปรับแต่งบริการให้เหมาะสมกับสถานการณ์ที่เปลี่ยนแปลง คุณสามารถติดต่อทีมแอดมินได้ทั้งทางโทรศัพท์หรือกรุ๊ปไลน์ ได้ทุกวัน - มีบริการช่วยจัดการสั่งงานการขนส่งให้
สำหรับองค์กรที่มีปริมาณการสั่งงานจำนวนมาก สกู๊ตตาร์สามารถช่วยจัดการสั่งงานการขนส่งให้ โดยทีมงานจะช่วยนำเข้าข้อมูลการจัดส่ง จัดเตรียมเอกสาร และประสานงานกับไรเดอร์ เพื่อให้การจัดส่งเป็นไปอย่างราบรื่น ช่วยลดภาระของพนักงานในองค์กรและลดความเสี่ยงจากความผิดพลาดในการป้อนข้อมูล รวมถึงสามารถเชื่อมต่อ Rest API* ได้อีกด้วย
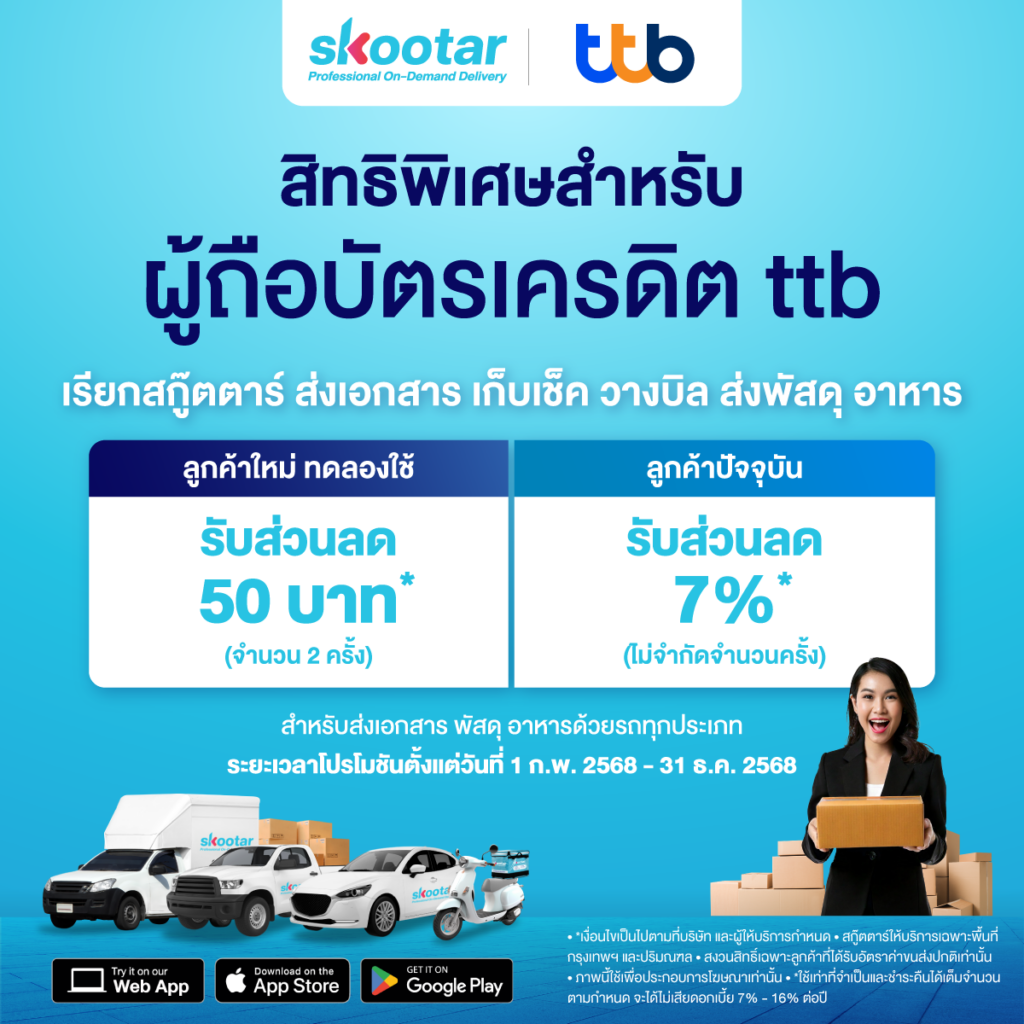
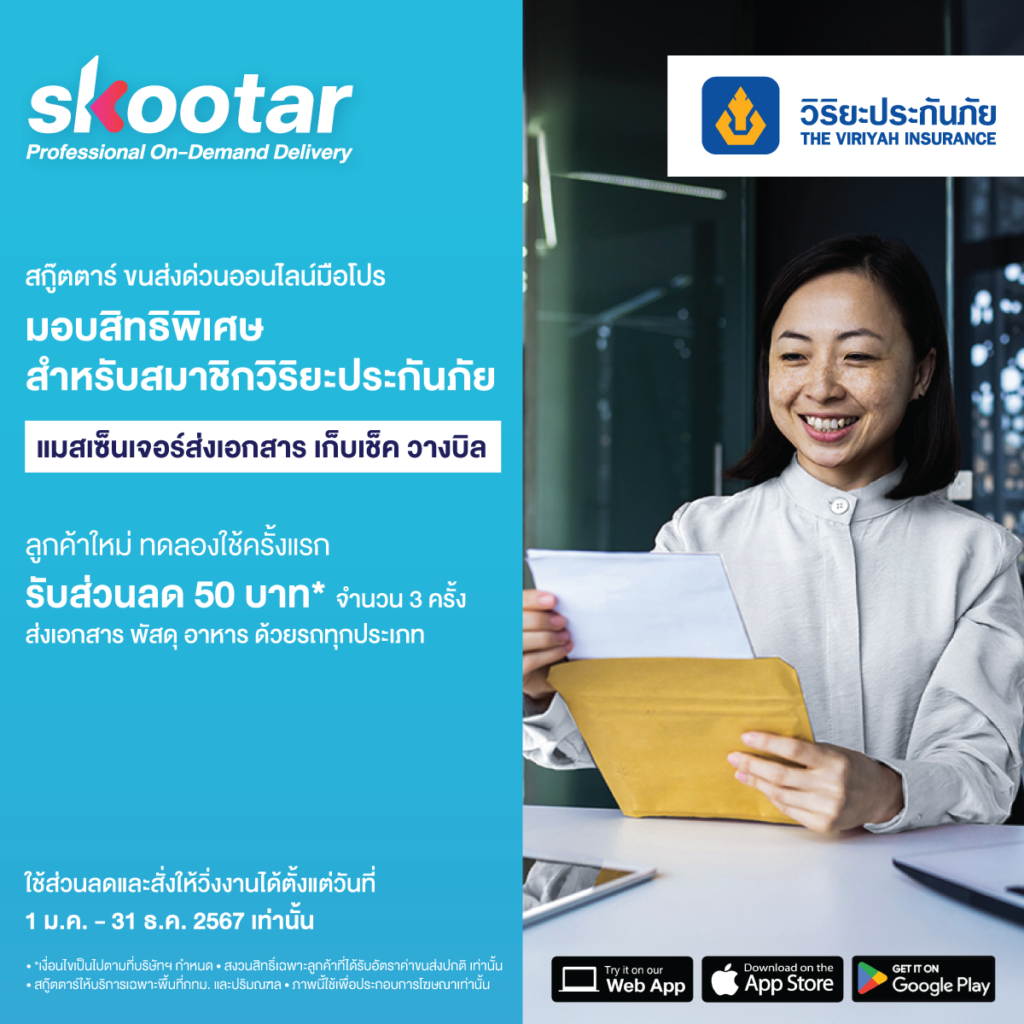
รับสิทธิพิเศษ 2 ต่อ*
จุดเด่นของ SKOOTAR บริการส่งของด่วนชลบุรี
- สั่งงานง่ายๆ 24 ชั่วโมงทุกวันผ่านเว็บ และแอปไม่มีวันหยุด ตอบโจทย์ธุรกิจหลากหลายรูปแบบ
SKOOTAR เข้าใจดีว่าธุรกิจไม่ได้หยุดทำงานเฉพาะในเวลาทำการปกติ โดยเฉพาะในยุคที่การค้าออนไลน์เติบโตอย่างรวดเร็ว บริการส่งของด่วนชลบุรี ของ SKOOTAR จึงพร้อมให้บริการคุณทุกวันไม่มีวันหยุด เพื่อให้ธุรกิจสามารถส่งสินค้าหรือเอกสารสำคัญได้ในช่วงเวลาที่เร่งด่วน รวมถึงการจัดส่งสินค้าในวันหยุด* - ติดตามพัสดุแบบเรียลไทม์ผ่าน GPS ทั้งบนเว็บไซต์ และแอปพลิเคชัน
หนึ่งในความกังวลของธุรกิจเมื่อใช้บริการส่งของด่วน คือการไม่ทราบสถานะของพัสดุว่าอยู่ที่ไหน และจะถึงเมื่อไร SKOOTAR แก้ปัญหานี้ด้วยระบบติดตามพัสดุแบบเรียลไทม์ผ่าน GPS สามารถเเชร์สถานะการจัดส่งให้ผู้รับได้หลายช่องทาง สามารถติดตามตำแหน่งของไรเดอร์ และพัสดุได้ตลอดเวลา สามารถติดต่อกับไรเดอร์ และฝ่ายบริการลูกค้าได้โดยตรงผ่านช่องแชทบนเว็บไซต์ และแอปพลิเคชัน
- คนขับมืออาชีพที่ผ่านการอบรมและคัดเลือกมาแล้ว
คุณภาพของ บริการส่งของด่วนชลบุรี ขึ้นอยู่กับคุณภาพของคนขับด้วย SKOOTAR จึงให้ความสำคัญกับการคัดเลือกและฝึกอบรม พี่คนขับในระบบต้องผ่านการตรวจสอบประวัติ* การอบรมด้านการบริการลูกค้า การจัดการพัสดุอย่างปลอดภัย และความรู้เกี่ยวกับเส้นทางในพื้นที่ชลบุรี ทำให้มั่นใจได้ว่าสินค้าและเอกสารจะถูกจัดส่งโดยทีมงานมืออาชีพที่น่าเชื่อถือ - มาตรฐานความปลอดภัยในการจัดส่งสินค้าและเอกสาร
SKOOTAR ใส่ใจ และให้ความสำคัญกับความปลอดภัยของสินค้า และเอกสารของคุณ คนขับในระบบของสกู๊ตตาร์ผ่านการตรวจสอบประวัติ* และอบรมแล้ว มีการถ่ายภาพหลักฐานการขนส่ง ทำให้มั่นใจได้ว่าพัสดุจะถูกส่งถึงมือผู้รับที่ถูกต้องนอกจากนี้ ยังสามารถตรวจสอบย้อนหลังได้หากเกิดปัญหาใดๆ ในการจัดส่ง
- ความรวดเร็วในการจัดส่ง (ระบุเวลาจัดส่งที่ชัดเจน)
SKOOTAR เข้าใจดีว่าเวลาคือโอกาส โดยเฉพาะสำหรับธุรกิจที่ต้องการส่งของด่วน บริการ ส่งของด่วนชลบุรี และพื้นที่อื่นๆ ของ SKOOTAR จึงมีการระบุเวลาจัดส่งที่ชัดเจน เพื่อให้พัสดุถึงมือผู้รับภายในเวลาที่กำหนด - การรับประกันความเสียหายของสินค้า
เพื่อสร้างความมั่นใจให้กับธุรกิจที่ใช้บริการ SKOOTAR มีประกัน* ความเสียหายของสินค้าระหว่างการขนส่ง
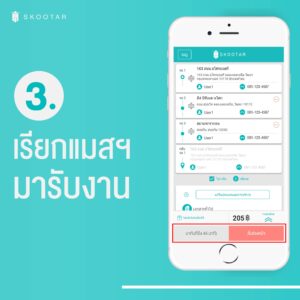
วิธีการใช้บริการส่งของด่วน SKOOTAR ในชลบุรี*
- สมัครใช้งานผ่านเว็บไซต์ หรือแอปพลิเคชัน ทั้งบน iOS และ Android
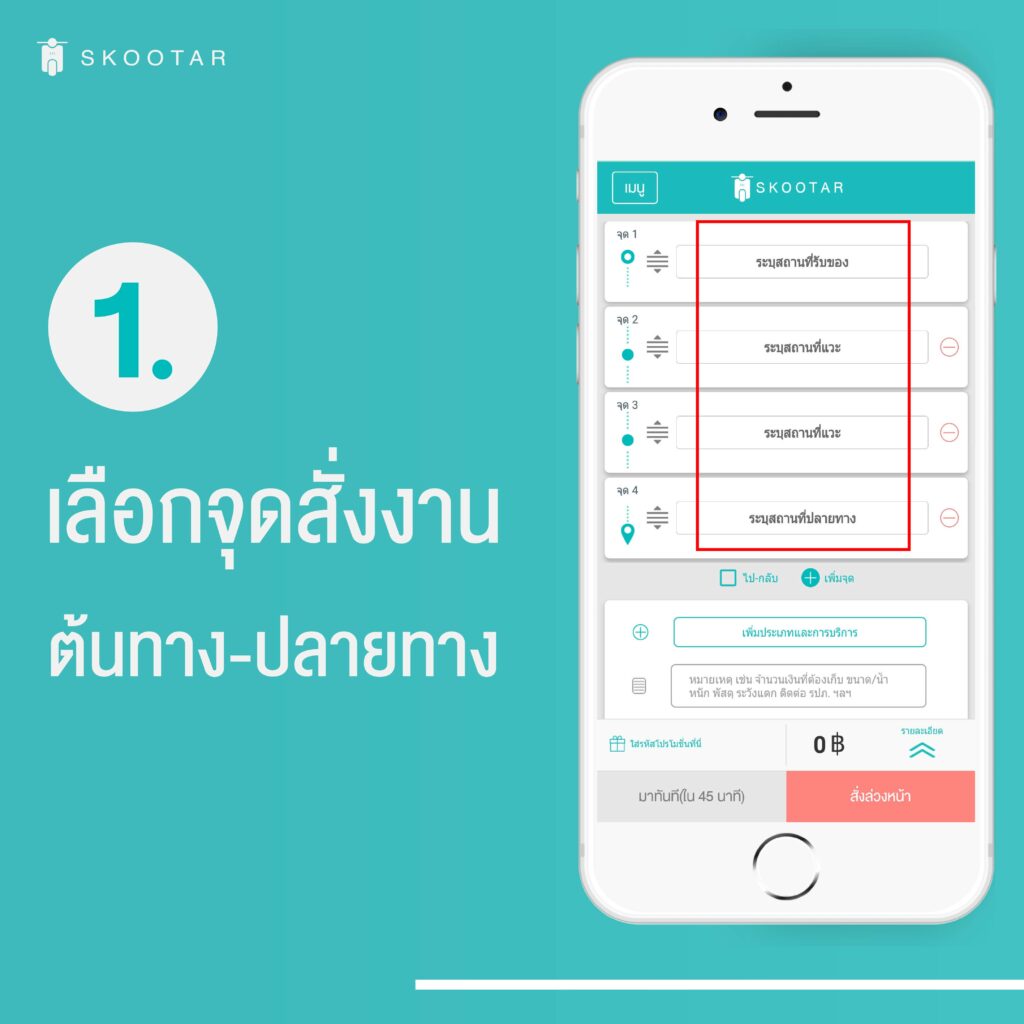
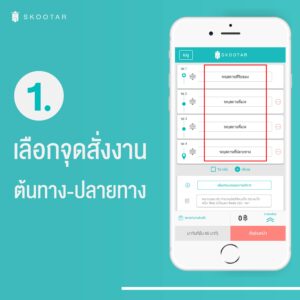
หรือสมัครเป็นลูกค้าแบบบริษัทได้ ที่นี่ - ระบุจุดรับ และจุดส่ง และประเภทงาน
- ตรวจสอบราคา และยืนยันการสั่งงาน (เรียกให้มาทันที หรือ สั่งงานล่วงหน้า)
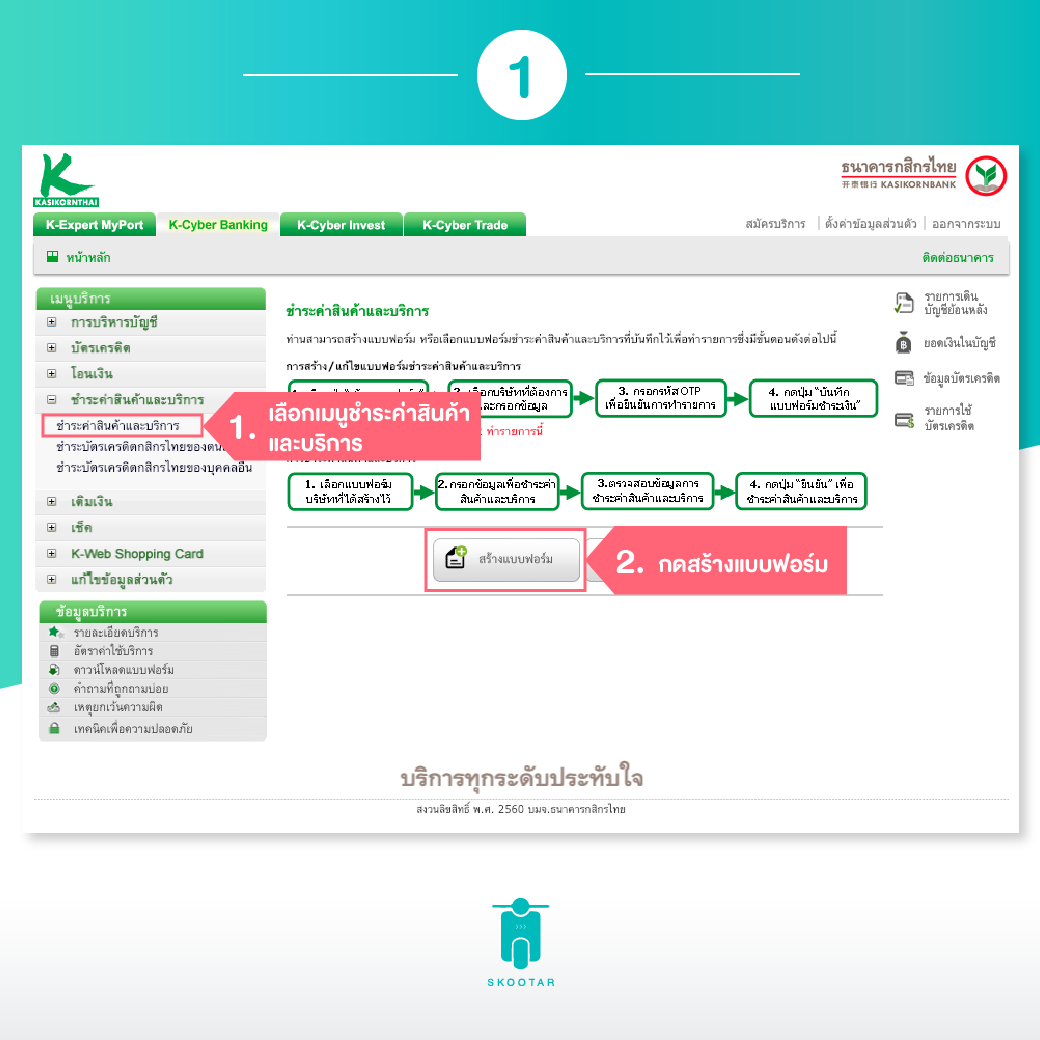
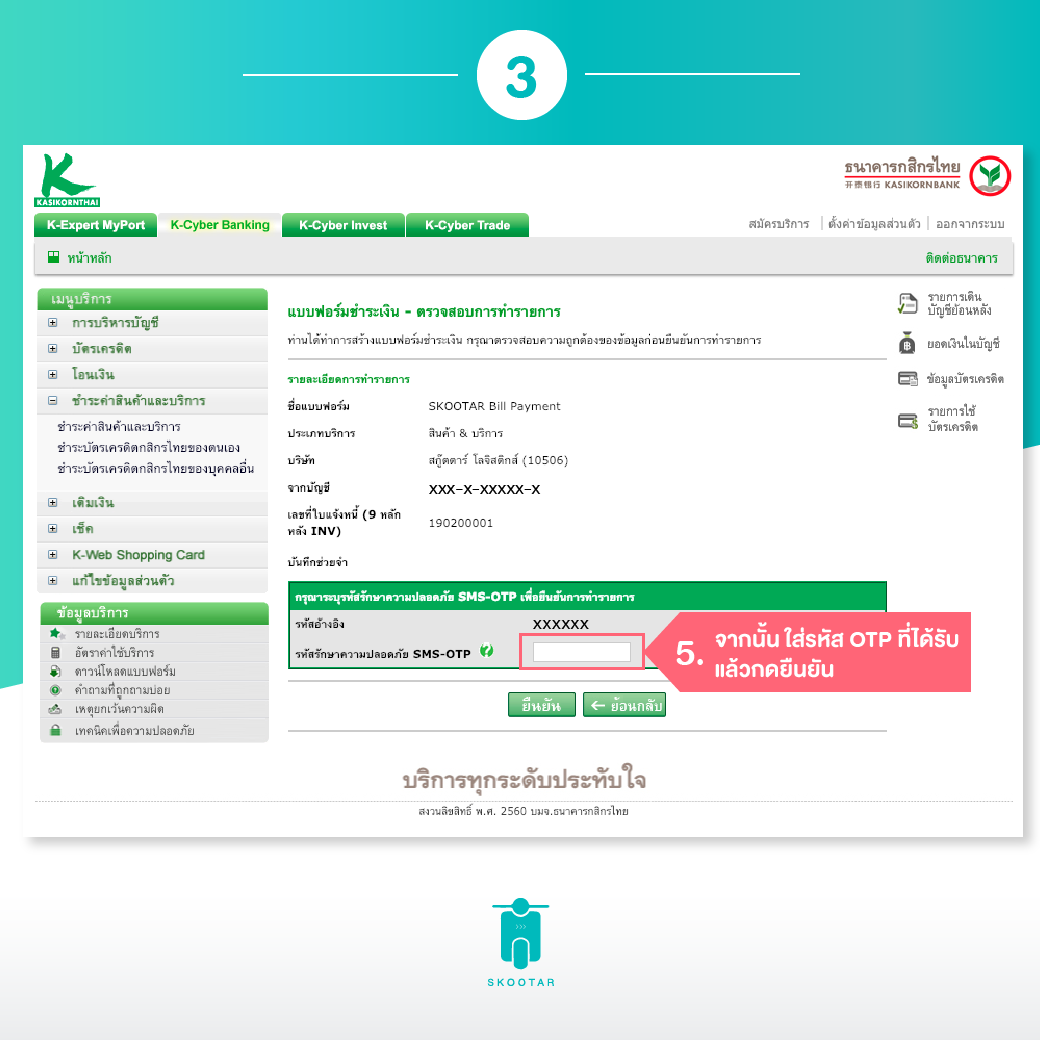
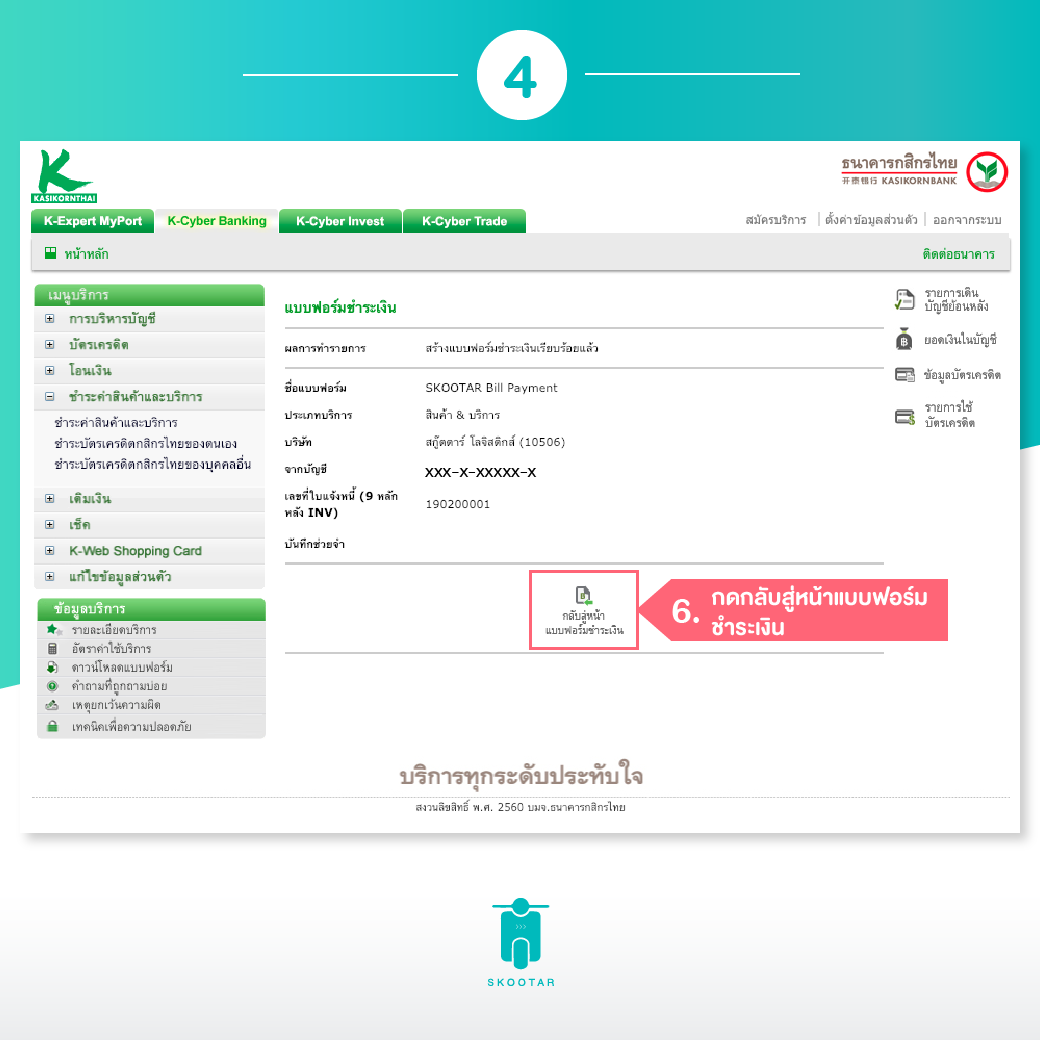
- ชำระค่าบริการ
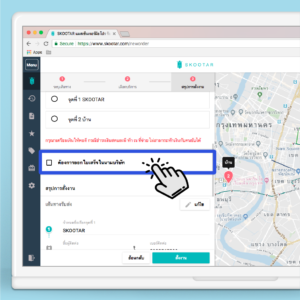
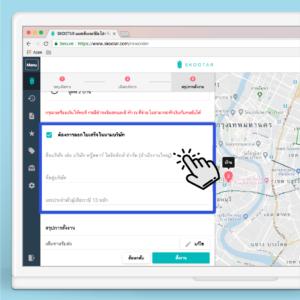
สนใจสมัครเป็นลูกค้าในรูปแบบบริษัทกับ SKOOTAR ง่ายๆ ใน 2 ขั้นตอน
- เข้าไปที่ https://www.skootar.com/business
- กรอกข้อมูลสำหรับลงทะเบียนเพื่อรับโบรชัวร์ผ่านอีเมล และรับฟังสิทธิประโยชน์จากฝ่ายขาย โดยฝ่ายขายจะติดต่อกลับโดยเร็วที่สุด
ค่าบริการส่งของด่วนชลบุรี* ส่งของด่วนศรีราชา ด้วย SKOOTAR
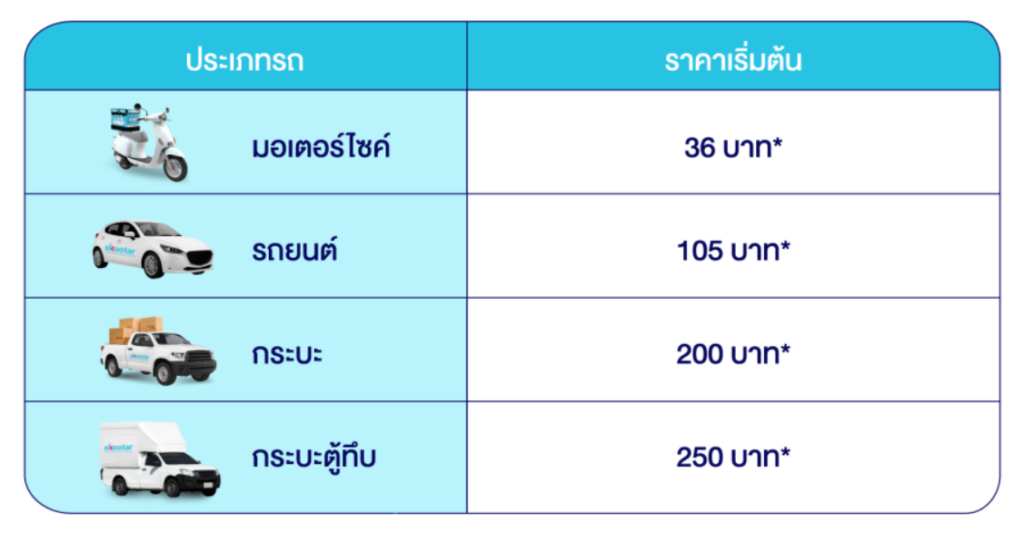
*ราคาค่าบริการจะเพิ่มขึ้นตามระยะทาง และเพิ่มขึ้นหากมีการเลือกใช้บริการเสริม
SKOOTAR บริการส่งของด่วนศรีราชา และชลบุรี* สะดวกอย่างไรบ้าง
- ประหยัดเวลาและทรัพยากร: ธุรกิจไม่จำเป็นต้องมีทีมขนส่งของตัวเอง สามารถเรียกใช้บริการได้ตามต้องการ ทำให้ลดต้นทุน และความยุ่งยากในการบริหารจัดการ
- ความยืดหยุ่นสูง: สามารถปรับเปลี่ยนปริมาณการใช้บริการได้ตามความต้องการทั้งแบบเรียกใช้รายครั้ง และเหมาใช้รายวัน
- สั่งงานได้ทุกวัน ตลอด 24 ชั่วโมง ผ่านเว็บไซต์ และแอป: กดสั่งงานจากที่ไหน และเวลาใดก็ได้ผ่านเว็บไซต์ และแอปพลิเคชัน
- ความโปร่งใส : ทั้งเรื่องราคาที่แสดงราคาจริงตั้งแต่ก่อนกดสั่งงาน และระบบติดตามแบบเรียลไทม์ ทำให้คุณสามารถรู้สถานะของพัสดุตลอดเวลา รวมถึงสามารถดูข้อมูลการจัดส่งย้อนหลังได้
- เพิ่มความพึงพอใจของลูกค้า: การจัดส่งที่รวดเร็ว สาภาพ และตรงเวลาช่วยยกระดับประสบการณ์ของลูกค้า ทำให้เกิดความประทับใจและกลับมาซื้อซ้ำ
FAQs เกี่ยวกับ SKOOTAR บริการส่งของด่วนชลบุรี สำหรับการใช้งานในรูปแบบบริษัท
- SKOOTAR บริการส่งของด่วนชลบุรี ใช้เวลาในการจัดส่งนานเท่าไร?
SKOOTAR สามารถจัดส่งได้เร็วสุดใน 2 ชั่วโมง (ขึ้นอยู่กับระยะทาง สภาพการจราจร สภาพอากาศ และพื้นที่ให้บริการ) สำหรับระยะเวลาจัดส่งโดยประมาณจะแสดงในหน้าสั่งงาน
- มีการคิดค่าบริการเพิ่มเติมในช่วงวันหยุดหรือไม่?
SKOOTAR ไม่มีการคิดค่าบริการเพิ่มเติมในวันหยุดเสาร์-อาทิตย์ ราคาค่าขนส่งจะขึ้นอยู่กับระยะทางจริงที่ทำการขนส่ง
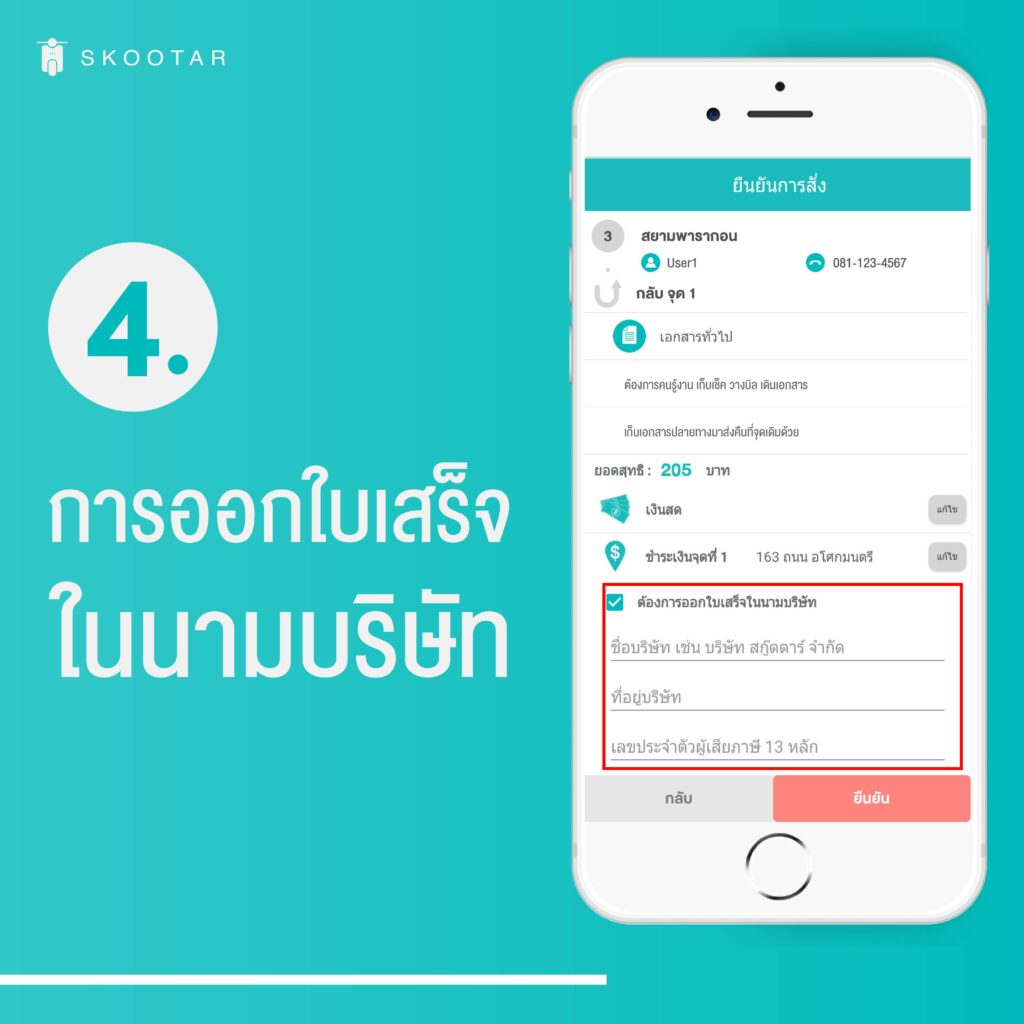
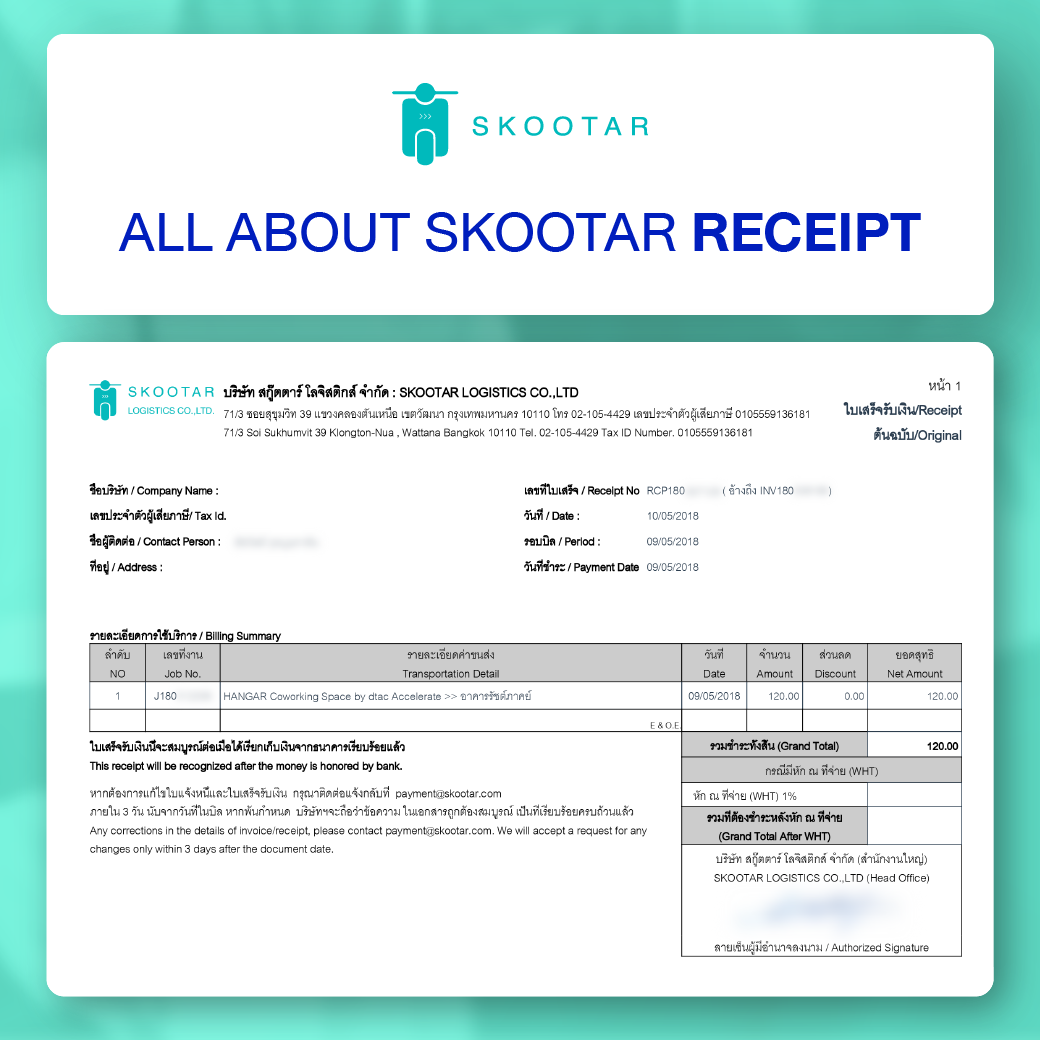
- สามารถออกใบกำกับภาษีแบบเต็มรูปแบบได้หรือไม่?
เนื่องจาก SKOOTAR เป็นกิจการประเภทขนส่งซึ่งได้รับการละเว้นภาษีมูลค่าเพิ่มจึงไม่มีการออกใบกำกับภาษี จะมีเพียงใบแจ้งหนี้และใบเสร็จรับเงิน ส่งให้ลูกค้าทางอีเมลที่ลงทะเบียนไว้ เมื่อลูกค้ามีการหักภาษี ณ ที่จ่าย (ค่าขนส่ง หัก 1%) ลูกค้าต้องส่งเป็นหนังสือรับรองภาษีหัก ณ ที่จ่าย ให้ทาง SKOOTAR - ต้องส่งพัสดุปริมาณเท่าไหร่จึงจะได้ราคาพิเศษ?
ขึ้นอยู่กับจำนวนยอดการใช้งานสะสม รายละเอียดเพิ่มเติม - มีบริการรับพัสดุถึงที่สำหรับลูกค้าองค์กรหรือไม่?
มี SKOOTAR รับถึงที่ส่งถึงมือ เร็วสุดใน 2 ชั่วโมง* - สามารถกำหนดเวลาจัดส่งแน่นอนได้หรือไม่?
ได้ คุณสามารถเลือกเวลารับส่งได้ในตอนสั่งงานโดยกดที่ปุ่ม สั่งงานล่วงหน้า - การชำระเงินสำหรับลูกค้าองค์กรทำได้อย่างไรบ้าง?
เงินสด พร้อมเพย์ บัตรเครดิต SKOOTAT wallet หรือ วางบิล* - มีบริการเก็บเอกสารคืนหรือไม่
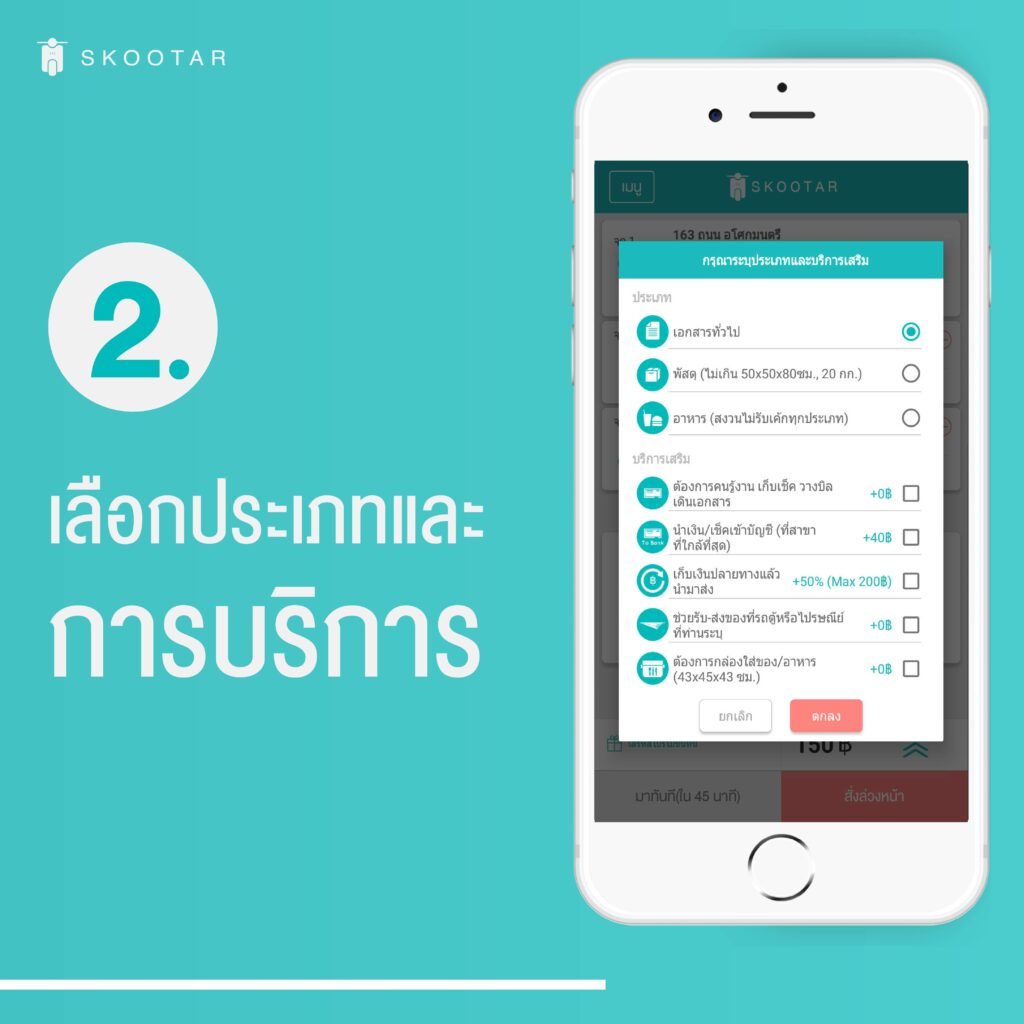
มี SKOOTAR มีบริการเก็บเอกสารตอบกลับหรือหลักฐานการรับสินค้าที่ลงนามแล้วจากผู้รับปลายทาง เหมาะสำหรับการส่งเอกสารสำคัญที่ต้องการหลักฐานการรับมอบ เช่น สัญญา เอกสารทางกฎหมาย หรือเช็ค โดยคนขับจะนำเอกสารดังกล่าวกลับมาส่งให้คุณพร้อมหลักฐานการส่งที่ครบถ้วน ทั้งนี้ มีค่าบริการเสริม* ตามประเภทของงานเอกสารโดยคุณสามารถทราบราคาค่าขนส่งและค่าบริการเสริมได้ก่อนกดสั่งงาน
บทความที่เกี่ยวข้อง
- สกู๊ตตาร์ส่งพัสดุด่วน ใน 2 ชม.*
- รับส่งพัสดุด่วน กระจายสินค้าเพื่อธุรกิจ สั่งงานได้ 24 ชม.ไม่มีวันหยุด
*เงื่อนไขเป็นไปตามที่บริษัทกำหนด
*เงื่อนไขการให้บริการในพื้นที่ชลบุรีเป็นไปตามที่บริษัทกำหนดโปรดศึกษารายละเอียดเพิ่มเติมที่นี่